First Steps In Linux: User Accounts, Filesystem, and Using The Terminal
We just finished installing a brand new Linux operating systems in our last series, and now we need to get a basic understanding of how everything works in this new environment.
Watch The Video
User Accounts & Privleges
When you were installing your operating system, you created the initial user along with a password so that they could log in. This initial user is a 'super-user', and has the ability to use elevated privleges by using the 'sudo' command in the terminal. You will be prompted to type in your user account password when using the 'sudo' command.
Its important to note that this is only typical of Ubuntu based systems, which limits access to the root (omnipotent) user account in favor of users using the sudo command
What can you use 'sudo' for?
You'll use sudo for many things, like installing programs, changing system settings, and editing files that require elevated permissions.
Let's see this for ourselves through an exercise, which should be almost identical across the three operating systems we've liked (KDE Neon, Pop!_OS, Linux Mint)
- Press the 'Windows / Super' key to start the application launcher
- Once you get a typing prompt, type 'Terminal'
- Once the terminal program appears (could be called Terminal or Konsole), press Enter
Notice that a prompt appears, this is a CLI (command line interface) that will allow you to do anything on the operating system if you know the right commands. You will notice your username is part of the prompt along with whatever you named your computer, since you're the currently logged in user on the current computer. Makes sense!
Now let's practice installing a program from the command line by running a simple command. Type in the following command and hit enter!
apt-get install
You should see the following message...

Since we didn't run our command with elevated privleges (sudo), our command ran into issues. Let's try again by putting sudo before the command.
sudo apt-get install

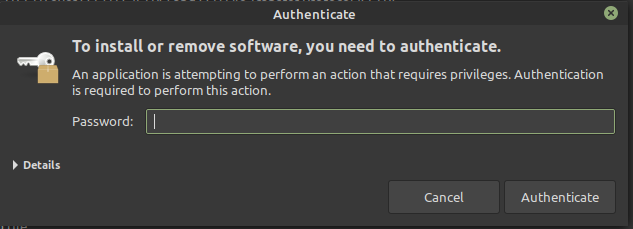
You'll first notice you are prompted to enter your password, and after putting it in successfully our command is able to run. However, since we didn't specify a package after 'install' nothing actually gets installed.
We can observe this same functionality by going to the software store and installing a program from there.
- Press Windows / super to bring up the application launcher
- Type in 'software'
- You should see a software store pop up (this can be called Discover (KDE), Pop Shop (Pop!_OS), or Software Manager (Linux Mint)
- Pick a piece of software to install by clicking on it to go to its profile page, and then hitting the install button (typically in the top right)
- Notice the authentication prompt
Conclusion
Now you've tested the sudo tool out and used it directly or indirectly through the command line or user interface. Most administrative tasks will require you to run commands with elevated privleges, but be wary that you are following instructions from a reputable resource before running commands with sudo.
Files & Folders
In Linux, most things are represented as a file
Yes this means that you'll find processes, devices, and much more represented within the filesystem on your machine. Linux was designed in this way to make it convienient for programmers to manage all types of things through their location on the filesystem.
It all starts with /
/, forward-slash, is the top most directory, it represents the entire filesystem and is referred to as the 'root directory'.
The entire filesystem is contained within this root directory - this is different than how files in Windows can be organized in named partitions (C drive) even though they reside on one disk.
Within the root directory are other directories, which can contain files or other directories, and we can traverse all the way down to a file's location by using its filesystem path.
Exercise
Let's practice navigating through our filesystem.
- First open a terminal (press meta, and start typing terminal, then press enter when its found)
- Then open your file manager (press meta, start typing file, then press enter when a program is found)
- Open these two windows side by side so you can see both.
By default, your file explorer will open to your user's home folder. Located in /home/username - and you should see the typical folders for different locations, typically Desktop, Documents, Downloads, Music, Pictures, and more.
Same with your terminal, if you type the command pwd (Print working directory)
pwd
You'll verify that you're in your home folder. You may also notice the tilde '~' or little squiggly next to the prompt. This signifies the current user's home folder and can be used as a shortcut to refer to it.
Let's make a folder here that we'll come back to later. Use the make directory (mkdir) command, followed by the name of the directory.
mkdir takebackourtech
Moving around
Let's now move to the root directory by using the cd (change directory) command.
cd /
We're moving to the root directory with this command. Now let's list (ls) the folders and files in this directory.
ls

You'll probably see something similar to the above, which contains every important directory in your machine, which we'll learn in depth later.
Let's navigate back to that directory (takebackourtech) we created earlier in one command!
We can construct the path back to that directory by listing through the directories we would need to get through in order to reach that directory. Then we simply join them with a forward slash between each directory to form the full path to the file or directory.
We can construct the absolute path (always starting from the root directory) by pre-pending the path with /, or we can use the relative path (starting from the current directory) by leaving out the first forward slash.
Since we're in the root directory anyways, the absolute and relative path back to the takebackourtech directory will look almost the same.
cd /home/your-username/takebackourtech
cd home/your-username/takebackourtech
We can also use the home shortcut ~ to quickly refer to the home folder path. The following command would have the same result.
Try typing the first few letters of the folder, (takebackourtech) and then press TAB to autocomplete. This is a great way to build file paths quicker.
cd ~/takebackourtech
From The Terminal To The File Manager
Now that we're back in the directory we created, we can take a look through the graphical file manager as well.
Run the following command based on your OS to launch your file manager in the current working directory (.)
KDE: dolphin .
Pop!_OS: nautilus .
Linux Mint (Cinnamon): nemo .
You should be shown the graphical file manager, in which you can move around by clicking on folders.
Other Navigation Commands
Go up into the parent directory cd ..
Go to root directory cd (with nothing after)
Practice
After adding your files in your home folder and organizing it, practice navigating through different directories using the terminal. You have all the commands that you need!
| Command | What it does |
|---|---|
mkdir name |
Creates a directory named name |
touch name |
Creates a file named name |
cp file destination |
Copies a file to destination |
mv file destination |
Moves a file to destination |
| ls | List all files in current directory |
| pwd | Print working directory |
| cd directory | Change directory |
Next Steps
- Organize your file system the way you like.
- Make a folder for Programs in your home folder. (/home/yourusername), you can store executables like AppImages here!
- Make shortcuts to your favorite folders by dragging them to the left-hand pane in the file manager.
Take Back Our Tech Newsletter
Join the newsletter to receive the latest updates in your inbox.


